
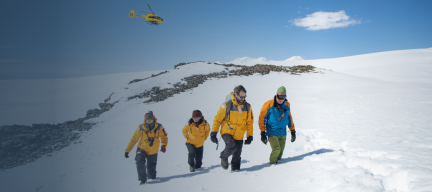


Planning for your Antarctic adventure? Be sure to pack your camera to capture the amazing wildlife and vistas found only on the seventh continent. Depending on when you visit and how far south you travel, you may expect to see several different penguin species, possibly including their colonies and chicks. Antarctica is also home to a number of different kinds of whales, fur seals, sea lions and a dazzling variety of seabirds. Of course, you can count on seeing the stunning Antarctic Peninsula itself!
As you might expect, the polar climate brings with it unique challenges to the photographer, whether professional or amateur. We tapped the expertise of David Merron, a renowned professional photographer who took part in several of Quark’s expeditions to the Antarctic Peninsula, for his expertise in polar photography. Here, Merron shares his tips on which photography equipment and related accessories you should bring along to ensure you take fantastic photos, but also to keep your camera and gear safe from the harsh elements of the extreme polar climate.

Image Credit: David Merron
Merron: I brought two different camera bodies, a Canon 5D MarkII and a Canon 7D, and several different Canon lenses: a 35mm 1.4L, 70-200mm IS, 135L 2.0, and a 17-40L 4.0. I also brought a 1.4x lens extender for getting tightly-focused shots, a Manfrotto tripod and GoPro for shooting video, and various lens filters – the most important being a polarizing filter to reduce the glare of sunlight off the water.
Quark: Are there any lenses that are particularly good for Arctic/Antarctic photography?Merron: Shooting in the polar regions consists of a lot of landscape and wildlife images. Generally, landscape images are taken with a wide-angle lens; I recommend using a Canon 17-40 4.0 lens. It worked perfectly for me, capturing nice, wide images and fast enough at 4.0 for the conditions we experienced. For wildlife photography, you’ll want to focus in tightly on the subject. I used my Canon 70-200 2.8L lens for the most part. In fact, this lens stayed on my camera the majority of the time! If I needed a bit of extra length, sometimes I would add on my 1.4x extender. As zooms go, I would have to say 200mm is the minimum length for a serious photographer, with 300mm being ideal.

Image Credit: David Merron
Merron: As always with photography, there are always things you want! There is always a better body, sharper and faster lens, and the like. But overall, I was happy with what was in my bag. If there were anything I would change, I would have left my 35mm lens at home and instead brought a 24-70mm 2.8 lens. The reason for this is flexibility: the 24-70mm lens is wider and longer than the 35mm, and although it’s a little slower — 1.4 as compared to 2.8 — with the amount of light in Antarctica, speed usually isn’t a big deal.
Quark: Are there any special considerations people should think of when choosing equipment as far as the climate or other conditions they may encounter with Quark?Merron: Weather can be very unpredictable, so you have to come prepared for any conditions. You’ll want to look for equipment that is weather-sealed. It may be more expensive, but it’ll give you peace of mind when travelling in the polar regions. Waterproof bags are also very helpful for protection from rain, snow, and saltwater. They can be bought for a few dollars, or hundreds of dollars. I used the cheap waterproof bags available at most camera stores while down in Antarctica, and they worked great!
You will definitely want to bring a dry bag to store your gear in for zodiac cruising and heading to shore. Saltwater is an electronics killer. Zodiac cruising can be very wet on occasion, so to be safe I always kept a dry bag handy to store my gear safely from the elements. I used this one from MEC and it worked great. I actually stored my normal camera backpack inside it and used the dry bag as my backpack. It took a little longer to get my gear, but it was always safe!

Image Credit: David Merron
To prevent this, before going onboard, place your gear inside a dry bag – a ziploc will do. Once inside, wait 60 to 90 minutes, allowing the temperature on the inside of the bag to warm up slowly to room temperature. Since your dry bag or ziploc is sealed, condensation won’t form inside. Voila! Another trick is to leave some packs of silica gel in your bag to absorb moisture.
Quark: What’s the ideal set-up for a pro-level photographer onboard? What about an amateur? Merron:Also, both will want to bring along extra batteries. Batteries lose their life quicker in colder climates. I had four batteries for three months while I was in Antarctica, and never had a problem. Just don’t forget to charge them overnight! For the amateur, I recommend doing a little research before you go to get a camera that will suit you well. Make sure it is something that you’re comfortable with. You don’t need super high-end gear to take great shots! Simple point-and-shoot cameras take wonderful photos nowadays.

Image Credit: David Merron
My first tip is to actually edit! It’s an absolute must. I use Adobe’s Lightroom, and love it. I highly recommend this program, both for editing and organizing your photos. If you’re serious and want to get the most out of your images, shoot in Raw. It involves much larger files and a lot more work post-processing/editing, but it’s well worth it in the end. That said, if you don’t see yourself willing to put time into editing after your trip, then I would just stick to shooting in JPGs – which is perfectly fine.
View more of David Merron’s Antartica photography.


